Tuesday, August 7, 2012

Chanel Jacket Finished!!

Yes, the jacket is done and I am very happy with it.  First I will show you a couple of pictures of the jacket on me.


I ended up with this sort of plain looking trim.  I didn't like the fuzzy look you see on many jackets.  I nixed the pockets also, although upon retrospect, I think I might add side pockets!  Not sure.

One comment I did want to make about sewing the Chanel jacket is about pressing.  I hardly pressed at all until the end!  Most garments that are made we end up pressing almost as much as the actual sewing time, but I think it is a combination of the nature of the fabric and the way the lining is sewed on the fashion fabric.  I did do a thorough pressing at the end and actually did some during the process, but I couldn't see a lot of difference.  Wonder if anyone has a comment on this.

I ended up hand sewing the sleeves in mainly because I didn't want to trim the sleeve seams until I was absolutely sure - so it was hard to find the spot to machine sew amongst the huge amount of excess sleeve allowance that was there.  I actually hand sewed it from the outside on the dress form.

I also put in a zipper, as you can see, which isn't very Chanel,  but I like to sometimes close the bottom 4-5 inches.

Here's the lovely chain I found at Home Depot!!


Monday, July 23, 2012

I am making a Chanel jacket!.  I have long wanted to make one.  I started reading  blogs to get information, especially this one.  I also bought Claire Schaeffer's Couture Sewing Techniques. 

Here is the beginning after cutting the pieces and thread tracing.


Since this boucle shreds up like Shredded Wheat, I put painter's tape around the edges  The lining is machine stitched to each piece.  You must cut each piece with a 1 1/2 inch seam allowance. This next picture shows the inside after stitching the seams together on the thread tracing.  I zigzaged the seams and trimmed them down.  Claire Schaeffer says to 1/4 inch.  I wasn't brave enough to trim mine that close!


The lining material is trimmed and folded and hand stitched.  You can see the result in this picture.


Here's how it is looking on my dress form.


And, finally, with one sleeve pinned on.  I am working on the sleeves now.


I have close to 20 hours work on her so far! 
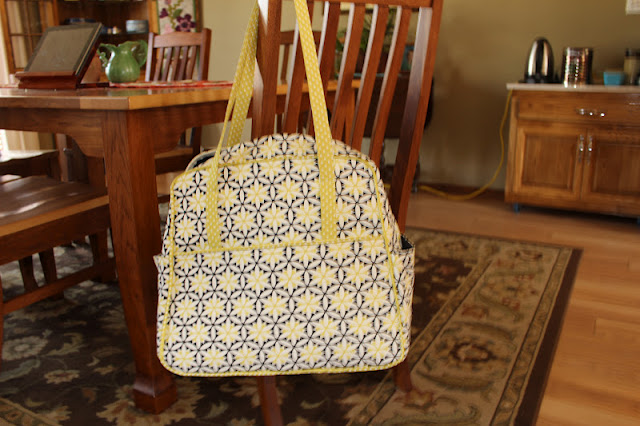
I made the Amy Butler Weekender Bag!  My daughter made one recently, and that inspired me to make mine.  There's lots of hints on the web from people who have made one.  The hardest part is stitching the bag together through all the layers, but Amy Butler says "go slow and be patient" and that does help.  Follow her instructions carefully and everything goes together pretty good.

I do love my new bag!


Friday, May 25, 2012

This is a lap quilt I made for an elderly man. The fabric is from Sweetwater. I wanted a little bit of a scrappy look, but I had a yen to make the log cabin pattern, which I haven't done for many years. I did a simple crosshatch quilting with a soft flannel on the back.


Tuesday, May 22, 2012

This is Sandra Betzina's V1275 again. This time I made the front with the gathered insert. It is easy to do. I actually took out some of the front gathers. I am not fond of a lot of poofy ness in the front. It fits well otherwise and, again, the raglan sleeve is nice.


T


This is fabric from Hancocks. It's actually a burn-out (the white stripe) but I interfaced the whole dress and like the way it drapes. It's from an old vintage pattern I have, and there are any number of patterns around that you could use. It's pretty simple - just front, back and sleeve. I like it a lot and am waiting for some warm weather around here to get a chance to wear it!


Tuesday, April 24, 2012

 Here are a couple of onesies I made for a new baby.  Not wanting to pay for a pattern :) I searched and found this pattern, which is a 6 month size.  I found a sleeve pattern and added the sleeves.


I think I have finally mastered putting snaps into knit fabric.  The problem I have found is that with the limp knit fabric, pulling on the snap when you try to open it not only is difficult to pull, but also weakens the fabric around the snap, even with interfacing underneath.  What I have found works is putting the snap in per usual, then taking a screwdriver of some type, or an object similar to that, and gently pushing the opening wider. I have found a needlenose pliers to work pretty well.  Here is a photo.


After gently pushing the opening a little try the snap again to see if it opens gently, but firmly.  If you've opened it a little too wide, just use the needlenose pliers to squeeze just a little all the way around to close it just a bit.  With a little practice you will be able to do it pretty fast and the snap will open without pulling on the fabric too much.

Monday, April 23, 2012

I bought Sandra Betzina's V1275. I found it to run fairly small according to my dimensions. You can either make the top with no gathers in the center front or with the gathers..  I chose the no gathers for the first time.  I have since made it with the gathers (post later.)  As Sandra mentions in her pattern instructions, because of the raglan-like sleeve, you don't have to worry about the shoulder fit, especially in the two-way stretch knit. I did fuse Pam's interfacing to the fabric, since I am not fond of slinky, clingy tops. It fits really well.
Sometimes I think I am a better sewist than I really am. I tried to apply the binding all the way around the neck edge, trying to scrunch it around the front corners. Trouble! It didn't look good. So I go back and read the instuctions and find out she just hems the front center piece and puts binding around the back and side. I really like the pattern and hope to make it again.
I do have several things to post on my blog. We finally had a sunny day and I got Tim to take photos of a few things I sewed recently. This one is a cute dog harness that I made for a cute little chih pom granddog. I will have to try and get a picture of him in the harness. It's quick and simple to make.

Monday, March 12, 2012

My New Dressform

My new My Twin Dressform has been done for several days now and I want to show you how I did it. This process is very possible to do, but you have to have a helper and a lot of DIY genes. I come from a long line of we-don't-have-to-buy-this-if-we-can-make-it people.

So when I was reorganizing my sewing room I came across this book again. I have glanced at it from time to time through the years, and suddenly got the urge to DO IT!

You will see that this book was published in 1994 the last time (at least the book I have). Pursuing the My Twin website I see that you can still purchase the booklet for $8.00, although I don't know if it is the same as the one I have.

Anyway, it was a long process, took quite a bit of internet research on my part to order and get the foam, and finish the dressform. My husband was invaluable....

I LOVE IT! First here is a side/back shot of Marley finished.


Here's the book:


I discovered that medical supply stores (as suggested in the book) won't sell you the bandages anymore. I found them at Hobby Lobby.


Here she is finished, cut in half and laying down to dry.


You stitch the halves together with needle and thread and then put a bandage across the center to fit the form back together again.
The book says to coat the inside with "green soap" (there is such a thing).She is coated twice with green soap to help release the form after the foam is poured.


Here she is ready for the form to be poured. The foam must be ordered from a marine urethane foam company of a certain density, etc. Very precise instructions about mixing and pouring.


Because of the fact that the foam hardens so quickly it must be poured into the form in several batches.


Some parts of the form peeled off easily. Others took quite a bit of work. Then you file it smooth.


Here's a close-up.


I am covering the form with rib knit here. I hand stitched it in the back.


There are lots of details that I won't write about, but if anyone is interested in doing this I could get you some tips. Just leave me a comment. I love my new dressform!

Thursday, March 8, 2012

Sewing Expo in Puyallup


My daughter and I spent a day at the Sewing Expo in Puyallup. We loved the Vogue booth and both of us got a few pieces of fabric. Maybe some pictures later. My husband took the camera to work today..... But here is a photo of the pencil skirt we made the next day from some Pendelton wool she purchased at their booth. We draped, fitted, lined and sewed up the skirt. Couldn't have spent a more enjoyable two days!

I am excited to make a long post soon of the dress form I recently finished making using the My Twin Dressform book. There are a couple more pictures I need to take (my husband took the camera today). Maybe this will help or inspire someone to do this.

Tuesday, February 28, 2012

Felted Purse

I just finished this felted purse and really am pleased with how it turned out. I am sorry that I can't remember the book I took the pattern from. It was from the library and called something like 25 New Felted Bags. Not sure if that is exact.

I had some clear handles in my purse stash and covered them with yarn. Dots of glue to hold the yarn in place.


Friday, February 10, 2012

A couple of projects completed today!

The first is a sock monkey for Conrad for Valentine's Day. This is continuing the tradition of Tim's mom of making a sock monkey for each one of her grandchildren. I used Carissa's (dd) tutorial.

The second are a couple of Baprons. Conrad is 9 months old now and eating baby food. The Baprons are super easy to make - the only glitch being sewing on bias tape, which can be tricky to catch the tape on the back side. One thing I did find helpful was to iron the tape in a curve before sewing it on. This helped it lay flat while sewing.


Thursday, February 2, 2012

Sewing Room Makeover

I have long wished for a laminate floor instead of the old 15 year old carpet in my sewing room. My wish came true! Since my husband is so willing, we (I mean he) went ahead and put the laminate down and repainted the room. It's a light, light, color because the more light the better in a sewing room. It's the palest, palest shade of green, which only shows in certain lights, but I love it. The organizer bins in the old dresser was an idea I gleaned from Pinerest. I just happened to have an old dresser in the basement, and, again, hubby, did the plywood insides for it. I love my new sewing room!

Before:


During:


Finished: