Monday, July 23, 2012

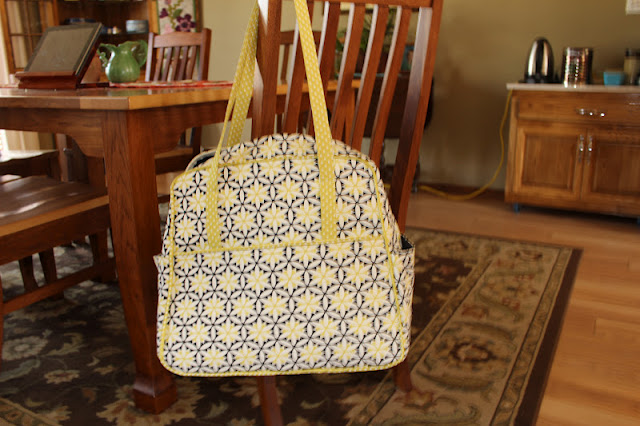
I made the Amy Butler Weekender Bag!  My daughter made one recently, and that inspired me to make mine.  There's lots of hints on the web from people who have made one.  The hardest part is stitching the bag together through all the layers, but Amy Butler says "go slow and be patient" and that does help.  Follow her instructions carefully and everything goes together pretty good.

I do love my new bag!


Friday, May 25, 2012

This is a lap quilt I made for an elderly man. The fabric is from Sweetwater. I wanted a little bit of a scrappy look, but I had a yen to make the log cabin pattern, which I haven't done for many years. I did a simple crosshatch quilting with a soft flannel on the back.


Tuesday, May 22, 2012

This is Sandra Betzina's V1275 again. This time I made the front with the gathered insert. It is easy to do. I actually took out some of the front gathers. I am not fond of a lot of poofy ness in the front. It fits well otherwise and, again, the raglan sleeve is nice.


T


This is fabric from Hancocks. It's actually a burn-out (the white stripe) but I interfaced the whole dress and like the way it drapes. It's from an old vintage pattern I have, and there are any number of patterns around that you could use. It's pretty simple - just front, back and sleeve. I like it a lot and am waiting for some warm weather around here to get a chance to wear it!


Tuesday, April 24, 2012

 Here are a couple of onesies I made for a new baby.  Not wanting to pay for a pattern :) I searched and found this pattern, which is a 6 month size.  I found a sleeve pattern and added the sleeves.


I think I have finally mastered putting snaps into knit fabric.  The problem I have found is that with the limp knit fabric, pulling on the snap when you try to open it not only is difficult to pull, but also weakens the fabric around the snap, even with interfacing underneath.  What I have found works is putting the snap in per usual, then taking a screwdriver of some type, or an object similar to that, and gently pushing the opening wider. I have found a needlenose pliers to work pretty well.  Here is a photo.


After gently pushing the opening a little try the snap again to see if it opens gently, but firmly.  If you've opened it a little too wide, just use the needlenose pliers to squeeze just a little all the way around to close it just a bit.  With a little practice you will be able to do it pretty fast and the snap will open without pulling on the fabric too much.

Monday, April 23, 2012

I bought Sandra Betzina's V1275. I found it to run fairly small according to my dimensions. You can either make the top with no gathers in the center front or with the gathers..  I chose the no gathers for the first time.  I have since made it with the gathers (post later.)  As Sandra mentions in her pattern instructions, because of the raglan-like sleeve, you don't have to worry about the shoulder fit, especially in the two-way stretch knit. I did fuse Pam's interfacing to the fabric, since I am not fond of slinky, clingy tops. It fits really well.
Sometimes I think I am a better sewist than I really am. I tried to apply the binding all the way around the neck edge, trying to scrunch it around the front corners. Trouble! It didn't look good. So I go back and read the instuctions and find out she just hems the front center piece and puts binding around the back and side. I really like the pattern and hope to make it again.
I do have several things to post on my blog. We finally had a sunny day and I got Tim to take photos of a few things I sewed recently. This one is a cute dog harness that I made for a cute little chih pom granddog. I will have to try and get a picture of him in the harness. It's quick and simple to make.

Monday, March 12, 2012

My New Dressform

My new My Twin Dressform has been done for several days now and I want to show you how I did it. This process is very possible to do, but you have to have a helper and a lot of DIY genes. I come from a long line of we-don't-have-to-buy-this-if-we-can-make-it people.

So when I was reorganizing my sewing room I came across this book again. I have glanced at it from time to time through the years, and suddenly got the urge to DO IT!

You will see that this book was published in 1994 the last time (at least the book I have). Pursuing the My Twin website I see that you can still purchase the booklet for $8.00, although I don't know if it is the same as the one I have.

Anyway, it was a long process, took quite a bit of internet research on my part to order and get the foam, and finish the dressform. My husband was invaluable....

I LOVE IT! First here is a side/back shot of Marley finished.


Here's the book:


I discovered that medical supply stores (as suggested in the book) won't sell you the bandages anymore. I found them at Hobby Lobby.


Here she is finished, cut in half and laying down to dry.


You stitch the halves together with needle and thread and then put a bandage across the center to fit the form back together again.
The book says to coat the inside with "green soap" (there is such a thing).She is coated twice with green soap to help release the form after the foam is poured.


Here she is ready for the form to be poured. The foam must be ordered from a marine urethane foam company of a certain density, etc. Very precise instructions about mixing and pouring.


Because of the fact that the foam hardens so quickly it must be poured into the form in several batches.


Some parts of the form peeled off easily. Others took quite a bit of work. Then you file it smooth.


Here's a close-up.


I am covering the form with rib knit here. I hand stitched it in the back.


There are lots of details that I won't write about, but if anyone is interested in doing this I could get you some tips. Just leave me a comment. I love my new dressform!